You've added an item to the cart! ×

User Manual V1.0

Bax Bangeetar Guitar Pre-EQ
Safety

Important Safety Information

1) Read these instructions.
2) Keep these instructions.
3) Heed all warnings.
4) Follow all instructions.
5) Do not use this apparatus near water.
6) Clean only with dry cloth.
7) Do not block any ventilation openings. Install in accordance with the manufacturer’s instructions.
8) Do not install near any heat sources such as radiators, heat registers, stoves, or other apparatus (including amplifiers) that produce heat.
9) Do not defeat the safety purpose of the polarised or grounding-type plug. A polarised plug has two blades with one wider than the other. A grounding type plug has two blades and a third grounding prong. The wide blade or the third prong are provided for your safety. If the provided plug does not fit into your outlet, consult an electrician for replacement of the obsolete outlet.
10) Protect the power cord from being walked on or pinched particularly at plugs, convenience receptacles, and the point where they exit from the apparatus.
11) Only use attachments/accessories specified by the manufacturer.
12) Use only with the cart, stand, tripod, bracket, or table specified by the manufacturer, or sold with the apparatus. When a cart is used, use caution when moving the cart/apparatus combination to avoid injury from tip-over.
13) Unplug this apparatus during lightning storms or when unused for long periods of time.
14) Refer all servicing to qualified service personnel. Servicing is required when the apparatus has been damaged in any way, such as power-supply cord or plug is damaged, liquid has been spilled or objects have fallen into the apparatus, the apparatus has been exposed to rain or moisture, does not operate normally, or has been dropped.

NO USER SERVICEABLE PARTS INSIDE. DO NOT ATTEMPT TO GAIN ACCESS TO THE INTERIOR OF THE PRODUCT. REFER ALL SERVICING TO AUTHORISED ORANGE SERVICE PERSONNEL

The lightning flash with arrowhead symbol, within an equilateral triangle, is intended to alert the user to the presence of un-insulated ‘dangerous voltage’ within the product’s enclosure that may be of sufficient magnitude to constitute a risk of electric shock to persons.

Terminals labelled as “Speaker Outputs” must be connected to a speaker cabinet of the designated load rating using an un-shielded two conductor cable for speaker use at all times during operation.

The exclamation point within an equilateral triangle and "WARNING" are intended to alert the user to the presence of important operating instructions. Failure to heed the instructions will result in severe injury or death.

WARNING: To reduce the risk of fire or electric shock, do not expose this apparatus to rain or moisture. For indoor use only. Do not place liquids, or objects containing liquids on or near the apparatus

Models which use a mains cord/plug to connect to the mains electricity supply must be connected to a mains socket outlet with a protective earthing connection. The voltage selector switch and mains fuse are set at the factory for the country or region in which this Orange product is intended to be sold. To prevent serious damage to the product, ensure that the rated AC mains voltage indicated on the product's rear panel agrees with the mains voltage from your AC mains outlet before connecting the mains cord/plug.

If the product is to be used outside of the factory set region, ensure the voltage selector switch (found on the rear or side panel) is set to the correct voltage for the new country/region and that the appropriate mains fuse is fitted in the pull-out fuse tray below the IEC mains input.

The correct mains fuse rating for your product is printed on the chassis. Use only the same 250V type and rating as specified for the product. Different operating voltages may require the use of different types of line cord and attachment plugs. If you are unsure, contact your Orange Dealer.

This Orange product fulfils the requirements of IEC 60065:2001 (Seventh Edition) + A1:2005 + A2:2010 for Audio, Video and Similar Electronic Apparatus.

This product complies with the WEEE Directive (2002/96/EC) marking requirement. This affixed product label indicates that you must not discard this electrical/electronic product in domestic household waste. Please contact your local authority for details of your nearest approved recycling facility.

This device complies with the Canadian Interference Regulations CAN ICES-3(B)/NMB-3(B).

This device complies with Part 15 of the FCC rules. Operation is subject to the following two conditions:

  1. This device may not cause harmful interference.
  2. This device must accept any interference received, that may cause undesired operation.

Note: This equipment has been tested and found to comply with the limits for Class B digital device, pursuant to Part 15 of the FCC Rules. These limits are designed to provide reasonable protection against harmful interference in a residential installation. This equipment generates, uses and can radiate radio frequency energy and if not installed and used in accordance with the instructions, may cause harmful interference to radio communications.

However, there is no guarantee that interference will not occur in a particular installation. If this equipment does cause harmful interference to radio or television reception, which can be determined by turning the equipment off and on, the user is encouraged to try and correct the interference by one or more of the following measures.

  • Reorient or relocate the receiving antenna.
  • Increase the separation between the equipment and receiver.
  • Connect the equipment into an outlet on a circuit different from that to which the receiver is connected.
  • Consult the dealer or an experienced radio/TV technician for help.

Changes or modifications not expressly approved by Orange Music Electronic Co. could void the user's authority to operate the equipment.

1
2
3
4
5
6
7
8
9
10
11
12
13
1

Input

2

Output

3

CabSim Output

4

Bypass Switch

5

Boost Switch

6

Volume

7

Gain

8

Bottom

9

Top

10

Mid

11

Q

12

Frequency

13

DC Input

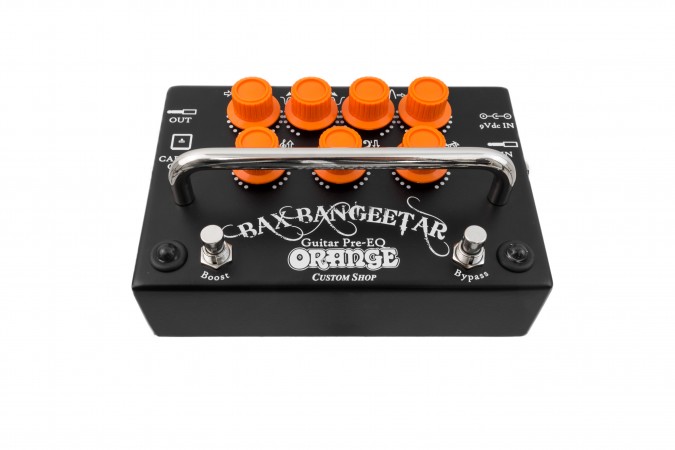
1. INPUTConnect your instrument to the input jack. This also switches on the power to the pedal. With no jack connected here, the pedal will not function.
2. OUTPUTA ‘regular’ output with no CabSim for connecting to a guitar amplifier. This output features a high quality ‘buffered bypass’ when the pedal is disengaged, so any length of cable can be used with no loss of clarity. Tip: Even with the pedal bypassed, this output can be used to buffer your passive guitar signal to the Line Input of your recording interface. This will help achieve the clearest input signal when using amp modelling software alone to record.
3. CABSIM OUTPUTAdds CabSim filtering to the overall tone which emulates the sound and frequency curve of an Orange 4×12” cabinet. This is particularly useful for recording or plugging directly into a PA. The CabSim is active even if the pedal ‘bypassed’.
4. BYPASS SWITCHEngages/bypasses the pedal. The blue LED will illuminate when the pedal is active. There must be a jack connected to the IN socket for the pedal to engage/power on.
5. BOOST SWITCHEngages the Boost function. The green LED will illuminate when the Boost is selected. The Boost is located after the GAIN control and can be used as a ‘clean’ volume boost when then pedal is engaged. The volume increase is dependant on where the VOL control is set. At higher volume settings, the level of boost will be reduced. The Boost will not function when the pedal is ‘bypassed’.
6. VOLUMEControls the overall output level when the pedal is engaged. For a ‘clean boost’-type setting on the pedal, increase the VOL control to push the amp harder.
7. GAINControls the gain level when the pedal is engaged. At lower settings, the Bax Bangeetar can be used as a light overdrive/boost to push the front end of an amplifier. As the GAIN is increased, so does the level of distortion and saturation. Higher GAIN settings will also increase the output volume. Set to minimum, no sound will be heard.
8. BOTTOMControls the low end/bass response when the pedal is engaged. Single coil pickups may benefit from increased low end to help ‘fatten’ up the tone. This also works great for heavier styles.
9. TOPControls the high end/treble response when the pedal is engaged. Increasing the TOP produces brighter tones for ‘livening up’ darker sounding guitars.
10. MIDControls the midrange response. Set to the middle position (12 o’clock/noon), the midrange is flat, with no cut or boost. Turning anticlockwise cuts the mids. Turning clockwise boosts the mids. The more severe the cut/boost, the more noticeable the effect on the sound will be. The effect of the MID control is defined by how the Q and FREQ controls are set.
11. Q Put very simply, the Q controls the ‘range’ of mid frequencies affected by the MID control. It also controls how ‘steep’ or ‘gradual’ the MID cut or boost will be. More accurately, the Q controls the bandwidth of the FREQUENCY control, sweeping from ‘narrow’ (anticlockwise) to wide (clockwise). A wider Q means a greater range of frequencies will be affected by the MID cut/boost, with a smoother, more gradual curve. A narrow Q means fewer frequencies will be affected but with a steeper, more ‘aggressive’ curve or ‘spike’. This is especially useful for cutting harsh or unwanted frequencies.
12. FREQ (Frequency)Moves the ‘centre frequency’ of the Q control from low mids to high mids. The centre frequency sweeps from 140Hz (fully anticlockwise) to 7.6kHz (fully clockwise).
13. DC INPUTWhen using an external power supply, the pedal can be run on 9–12 Vdc (regulated). The barrel plug should be a ‘standard 2.1mm pedal type’ with a centre negative polarity (centre –). The maximum current draw of the Bax Bangeetar at 9 Vdc is 81 mA. Make sure the power supply meets these specifications.

QUICK START GUIDE

The parametric mid controls are powerful tone-shaping tools and can be used to broadly affect the midrange response of your rig, or to fine-tune a narrow range of frequencies to your taste. ‘Cutting’ the frequencies you don’t want to hear can often be more effective than ‘boosting’ those you do want to hear. 

There are no rules to using EQ, but, by using the steps below, you will learn how to quickly access the most usable tones within the pedal and help your ears tune to how the controls interact. However, experimentation can unearth some seriously far out sounds!

Step 1: Dial Your Base Tone

Set the MID, Q and FREQ controls to their middle positions (12 o’clock /noon). Adjust the GAIN, TOP, BOTTOM and VOL controls to find broadly the tone you want, e.g. clean boost, light overdrive, heavy distortion etc. Most clean channels on amplifiers are brighter at lower volumes. As your amp’s volume increases, you may need to adjust the TOP control.

Step 2: Find the Frequency

  1. a) Set the Q to fairly narrow (below noon);
  2. b) Set the MID to fully boosted (clockwise);
  3. c) Play whilst turning/sweeping the FREQ

Because you are boosting certain frequencies, you can better identify the frequencies that you either like or dislike by using your ears as you sweep the FREQ control. For example, you may come across an undesirable frequency that you’ll want to cut, or a frequency that has a positive effect on your tone you may wish to boost.

Step 3: Fine-Tune the Q

You should now have a general idea of the frequencies you want to affect. Next, try adjusting the Q to hone in the exact area(s) you want to fine-tune or ‘broaden’. For example:

  1. a) A very narrow Q (fully anticlockwise) can be used to pinpoint a very specific set of frequencies you may want to cut or boost without having too much effect on the rest of your tone. This works especially well for taming (cutting) problem frequencies, e.g. a narrow range of harsh high mid frequencies, or ‘honky’ low mid frequencies.
  1. b) A wider Q (past 12 o’clock/noon) has a smoother effect on the EQ curve. This can be particularly effective when used to add a more subtle midrange boost (‘hump’) for leads, or when shaping a deep broad mid cut for ‘scooped’ high gain rhythm tones.

Step 4: Adjust the Level of Cut/Boost

The final step is to adjust the MID control, depending on how much cut/boost you want to achieve. Each ‘click’ on the knob is approximately 1dB of adjustment, in whichever direction it is turned. The effect will depend on the Q. Again, use your ears!

OUTPUTS

The Bax Bangeetar’s two outputs can be used in a number of ways for both live and studio use:

  • OUT connected to the input of a guitar amplifier as a boost/distortion/EQ pedal;
  • OUT connected to an external power amp, or the effects return (‘power amp in’) of an amp’s effect loop;
  • CAB SIM OUT to a recording console;
  • CAB SIM OUT to a PA via a DI box;
  • OUT to a guitar amp, CAB SIM OUT to PA/recording console via a DI box;
  • (Pedal disengaged) OUT to a recording interface’s Line Input and modelling software.

Tip: If ground hum occurs when using both outputs, engage the ‘Ground Lift’ function on the DI box/desk.

REPLACING THE BATTERY

The battery should be replaced if you notice a drop in ‘headroom’ when the pedal is engaged, or when the LEDs begin to dim. To conserve the battery, unplug your guitar from the IN when not in use.  Remove the battery when not used for long periods.

The Bax Bangeeter is powered by a single 9V (PP3/6F22) battery. To replace the battery, unfasten the four screws on the ends/sides of the pedal which secure the base. Remove the base and replace the battery, ensuring it is firmly secured in the metal clip. Be sure to observe the battery’s polarity (+ vs. –).